


Table of Contents
Pre-move floorplan mapping helps you see how your current home will fit your next one. It compares both layouts before the truck arrives. You can check furniture sizes, room uses, doorways and access routes early.
A room that looks generous on paper can feel tight once furniture arrives. A sofa may fit the lounge but fail at the stair turn. Measure twice, move once. That old rule can save time, stress and avoidable handling costs.
This guide focuses on Sydney houses, terraces and apartments. It shows how to build a useful plan, not a perfect architectural drawing. You can then share the same details with your chosen removalists.
Step-by-Step Mapping Process
A clear mapping process compares the old home, the new home and every large item. Think of the plan as a moving-day map, not a decoration. Start with reliable measurements, then add real-life details.
Gather dimensions
Measure every room that will hold furniture. Record wall lengths, ceiling height and usable floor space. Include alcoves, built-in wardrobes, kitchen islands and fixed shelves. Measure doorways and hallways too. Write down the narrowest clear opening, not just the door size.
Measure bulky furniture at its widest, deepest and tallest points. Include handles, feet and removable parts. Note whether legs or doors can come off safely. Take photos of awkward pieces, such as recliners, modular lounges and tall bookcases. Measure twice, move once.

Obtain the new blueprint
Ask for the latest floorplan for the property you will occupy. Request room dimensions, wall positions, door swings and fixed fittings. For a new build, ask the developer or builder for the final plan set. A sales brochure may show an earlier design.
Check the drawing date and revision number. Ask whether the dimensions are internal or external. Confirm whether the plan includes wardrobes, cabinetry, bulkheads and balconies. A stitch in time matters when you are planning a large move.
Account for architectural bottlenecks
Mark every point where furniture may need to turn or tilt. Include stair landings, narrow halls, low ceilings and tight entry corners. A piece can fit inside a room yet fail on the route into it. Forewarned is forearmed.
Measure the approach from the street to the front door. Check gates, porch columns, screen doors and steps. In apartments, add the lift entrance and cabin. In older terraces, inspect the stair shape and landing depth.
Map by zone
Divide the new home into practical zones. Use labels such as living, dining, main bedroom, study and storage. Give each room a clear code, such as L1 or B2. Use the same code on the floorplan, furniture list and box labels.
Keep the system simple. Mark fixed items first, then place large furniture. Add smaller pieces only after circulation space is clear. The early bird catches the worm, especially when several rooms need attention.
Sourcing Your Target Floorplans in Sydney
You can source Sydney floorplans from agents, developers, councils or measured site visits. The best source depends on the property and your access rights. Do not assume every plan online shows final dimensions. Ask early and keep a copy of each revision.
Property Developer/Agent Request
Start with the agent, developer or property manager. Ask for the current plan in PDF format. Request the dimensioned version, not only the marketing layout. For a new apartment, ask for the final lot plan and any available internal layout drawing.
Ask whether the plan reflects final site conditions. Confirm if room sizes changed during construction. A newer file can replace an old brochure without changing the property listing. The early bird catches the worm, so request it before settlement week.
Local Council Access
A local council may hold development applications, approved drawings or building records. Access rules vary by council and document type. Internal floorplans can be restricted for privacy and copyright reasons. You may need owner consent or a formal request.
For example, read Burwood Council’s floor plan access guidance before requesting internal plans in that area. Burwood Council explains that access to internal floorplans may require owner consent. Do not assume the same process applies across every Sydney council. Ask the relevant council directly.
Did you know?
Some NSW council records do not provide unrestricted access to internal floorplans. Privacy and copyright rules can affect viewing and copying. Check the local council process before relying on council records.
Digital Scan Capture
A digital scan can help when no suitable floorplan exists. Room-scanning apps use a phone camera or depth sensor. Results can vary with lighting, reflective surfaces and room shape. Use scans as a planning aid, not a final measurement certificate.
Scan each room slowly and capture corners, alcoves and built-in features. Compare key lengths with a tape or laser measure. Save the scan with its capture date. Trust, but verify, before you assign large furniture. Tip: Mark verified dimensions in a second colour.
Professional Site Measurement
A professional measurement visit is useful when plans are missing or uncertain. Ask the measurer to record internal dimensions and fixed obstructions. Explain that furniture movement is the purpose. Request doorway, corridor, stair and lift measurements too.
For a complex apartment or a large home, this can be worth the extra planning. It helps with angled walls and custom joinery. Good information beats guesswork. Tip: Keep the final measurement sheet beside the floorplan.
Verify Both Floorplans Against Final Site Conditions
Check both plans against the real properties before trusting the mapping. Plans may be outdated, simplified or measured differently. Compare the drawing with the rooms you can inspect. Do not treat a marketing plan as a moving-day guarantee.
At the old home, note renovations, new storage and furniture changes since the plan date. At the new home, confirm finished wall positions, door swings and fixed fittings. Measure again after settlement or handover when access allows.
Use the same measurement method in both properties. Record metres or millimetres consistently. Label each measurement as confirmed, estimated or unknown. This small step prevents a guess from looking like a fact.
Ask the agent or builder about recent changes. Check whether a doorway has a new trim or a wardrobe has been added. Note any items that could not be inspected. Better safe than sorry.
Create a Room-to-Room Furniture Allocation Matrix
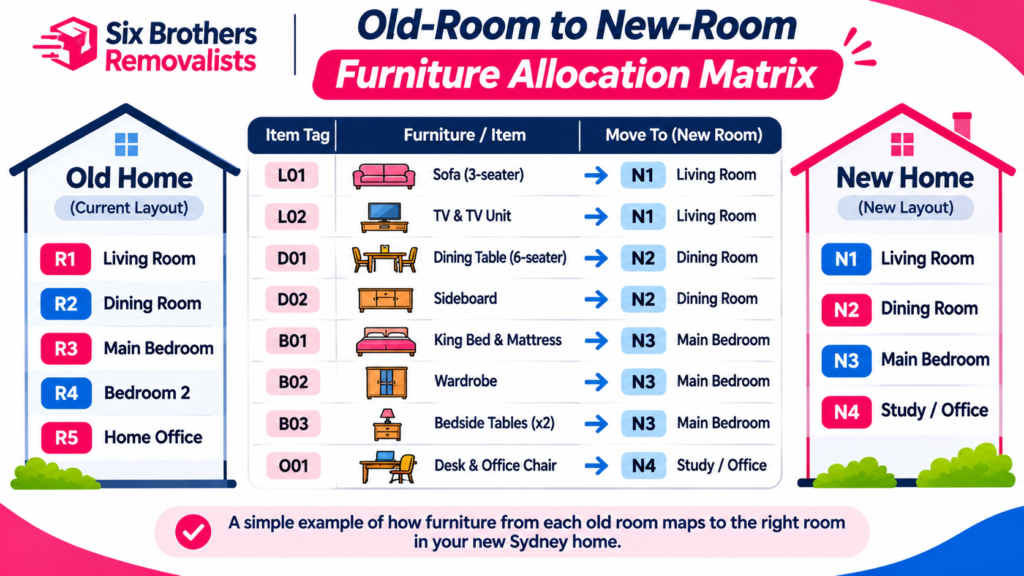
A room-to-room furniture allocation matrix gives every item a destination or a clear next step. It connects the old layout to the new one. This is where the floorplan becomes a practical furniture placement plan. A place for everything keeps the move easier to manage.
Match Existing Rooms to New Rooms
Match rooms by function first, then by available space. The old dining room may become part of an open-plan living zone. A spare bedroom may become a study. Do not assume the same room name means the same usable area.
Compare the doors, windows and built-in features before assigning furniture. A desk that worked beside one window may block a wardrobe in the new room. Keep a short note beside each room match. What good is a room label if a sofa cannot reach it?
Assign Furniture by Destination Zone
Give each large item a destination room and zone code. For example, tag the sofa as L1-S01 and the dining table as D1-T01. Add the item dimensions beside its code. This helps the crew and household use one shared plan.
Place large pieces first. Leave clear paths to doors, windows and wardrobes. Test the dining chairs when pulled back. Keep space for opening drawers and using power points.
Identify Items Without a Suitable Destination
List items that do not fit the new layout. These may include spare beds, large cabinets and duplicate tables. Decide whether to sell, donate, store or keep each item. Do this before packing begins.
Avoid moving an item simply because it belonged in the old home. The new floorplan may need a different setup. One less bulky item can mean one less access problem.
Separate Storage and Disposal Items
Use separate labels for storage, donation, sale and disposal. Keep these items away from the confirmed moving list. Check storage access and unit dimensions before booking space. Follow local council rules for disposal and collection.
Do not mix these categories on the master plan. Clear labels reduce last-minute questions. Many hands make light work when everyone follows the same system.
| Old room | New destination | Example items | Decision |
| Living room | Open-plan living | Sofa, TV unit, side table | Check wall space and carry route |
| Dining room | Kitchen / dining zone | Table, chairs, buffet | Test chair pull-back clearance |
| Spare bedroom | Study | Desk, bookcase, office chair | Check window and power access |
| Garage | Storage / utility | Shelving, tools, tubs | Measure storage footprint |
| No matching room | Store or release | Extra bed, duplicate cabinet | Decide before quote and packing |
Test Furniture Footprints Against Usable Room Space
Test each furniture footprint against the usable space, not the room label. A room can look large but lose space to doors, wardrobes and fixed fittings. Draw furniture to scale where possible. A furniture footprint calculator can help, but check the result on site.
Compare item width, depth and height with the destination room. Then check the way people will walk around it. Measure the gap needed to open drawers, pull out chairs and reach windows. Leave a clear path to the main exit.
For example, draw a sofa, coffee table and TV unit on the same plan. Check whether the sofa blocks a sliding door. Then test the dining table with chairs pulled back. The furniture puzzle only works when people can move around it.
Do not rely on a room-size figure alone. Usable floor space can differ from the number printed on a plan. Skirting boards, alcoves, columns and built-in storage all change the fit. Better to find out now than after unloading.
Critical Sydney Architecture Considerations
Sydney homes have different layout challenges across terraces, apartments and newer estates. The floorplan should reflect the building you are moving into. Local design can change furniture fit and access. Horses for courses applies here.
Heritage Terraces (Inner West/East)
Some terraces in Newtown, Paddington, Glebe and Balmain have narrow halls or steep stairs. Older layouts can include tight turns, high thresholds and unusual room shapes. Measure each pinch point rather than relying on a room plan alone.
Check whether a large sofa can pass through the front door. Measure the stair width and landing. Note ornate fittings, older balustrades and delicate surfaces. Protect heritage features before moving bulky items.
Modern Apartments (CBD/Green Square)
Modern apartments in the CBD and Green Square often have managed access. The unit layout is only one part of the move. Check the service lift, loading dock, visitor entry and building move-in process.
Some plans show balcony space or wall measurements that do not describe the clear indoor route. Ask building management for lift dimensions and move-in rules. In a high-rise, access planning matters as much as the furniture layout.
The Sydney Terrace Bottleneck
A terrace bottleneck is often a stair turn, doorway or narrow hallway. Measure the tightest point along the full route. Include the handrail, light fittings and door stops. A long item may need to turn at an angle.
Do not force furniture through a tight opening. Ask your removalist to assess awkward pieces before moving day. Check whether safe disassembly is possible. An extra measurement now can prevent damage later.
The Micro-Climate & Solar Sweep
Sunlight can affect where you place furniture in Sydney homes. Track the sun across the rooms at different times. Notice glare, heat and direct light near windows. North-facing rooms often receive stronger winter sun, but nearby buildings and shading matter.
Keep sensitive fabrics and timber away from harsh direct sun where practical. Avoid blocking vents and opening windows. A comfortable layout should work in summer and winter. Watch how the light moves before fixing the final arrangement.
Swing and Socket Clearances
Check every door swing, wardrobe door and appliance opening. Mark power points, switches and data sockets on the plan. Leave room to open cupboards and access charging points. A beautiful layout is no help when a door cannot open.
Measure the full door arc where a large item may sit nearby. Check bedside tables against wardrobe doors. Keep power boards and cables out of walking paths. Measure the details, then decide.
Map the Complete Carry Route Into the New Property
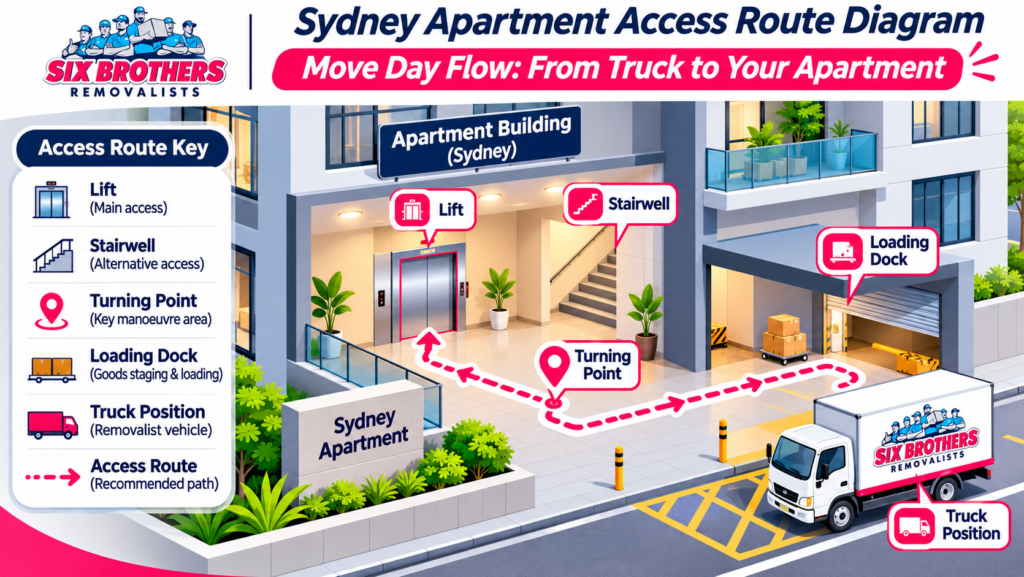
Map the full carry route from the truck position to each destination room. A furniture item must fit along the whole route, not only at the room entrance. Draw every turn and level change. The long way round may be the only workable way in.
Measure Entry and Internal Doorways
Measure the clear width and height of the front entry and internal doors. Record the narrowest usable opening. Include handles, door closers and fixed trims. Check whether doors can be safely removed or held open.
Measure the furniture in the same orientation you expect to carry it. Note removable legs and other parts. If a piece must tilt, record the ceiling and wall clearances. Do not guess based on a photo.
Check Lift and Stairwell Dimensions
For apartments, measure the lift cabin, door opening and access lobby. Check the posted weight limit with building management. Ask whether the service lift needs protective padding or a booking. Why wait until moving day to learn it is too small?
For stairs, record width, landing depth, ceiling height and handrail position. Measure at every turn. A straight stair and a dog-leg stair need different checks. Make sure the route is safe for the crew.
Identify Narrow Turning Points
Mark every corner where a large item must rotate. Include corridor junctions, stair landings and tight apartment entries. Measure the available diagonal space where it helps. A plan view can hide a difficult vertical turn.
Photograph the tight spots from both directions. Add a note beside the relevant item. Share the photos before the quote is finalised. Forewarned is forearmed.
Assess Truck-to-Entrance Carrying Distance
Measure or estimate the distance from the truck position to the building entrance. Record steps, slopes, gates and long corridors. Check whether a loading zone or driveway can be used. Explain any time limits or access rules.
In busy parts of Sydney, kerb access can be limited. Parramatta, the CBD and some Inner West streets need careful parking checks. Do not assume a truck can stop outside the front door. Ask the building manager or council where needed.
Account for Strata and Building Move-In Requirements
Check strata and building rules before confirming the move date. Apartment access may require a lift booking, loading dock slot or protective covering. Each building can set its own process. Good neighbours make a smoother move.
Confirm Service Lift Reservations
Ask whether the building has a dedicated service lift. Check the booking process, time slots and maximum booking length. Confirm the lift dimensions and capacity. Ask whether a resident must attend the booking.
Get the booking confirmation in writing. Share the time slot with your removalists. A lift booked for the wrong window can delay the whole day.
Check Loading Dock Restrictions
Ask where the truck may park and unload. Check vehicle height, length and weight limits. Some docks have ramp, clearance or time restrictions. Confirm whether a spotter or building pass is required.
For street loading, check local signs and restrictions. Do not rely on a map pin alone. The actual truck approach may differ from the walking route.
Verify Permitted Moving Hours
Confirm the building’s permitted moving hours before you book. Ask about weekday, weekend and public holiday rules. Some schemes limit noisy work or shared-area use. Record the approved start and finish times.
Read the NSW strata by-laws and the building’s own rules. NSW strata schemes can have different by-laws. The building manager can explain the local move-in process. Do not assume every Sydney apartment follows the same hours.
Arrange Common-Area Protection
Ask who supplies lift pads, corner guards and floor protection. Confirm whether the building needs photos before and after the move. Check any bond or deposit process with management. Keep the approval email with your moving documents.
Protect shared hallways, lifts and lobby surfaces. Agree who reports existing damage before work begins. Clear instructions help everyone. Many a small problem is easier to solve before the first box moves.
Digital Tools vs. Physical Mapping
Digital tools make floorplan mapping easier to edit and share. Physical measurement checks whether the digital plan matches the real room. Use both when the move has bulky furniture or tricky access. Horses for courses, again.
A phone scan or room planner can show room shape and furniture placement. A 2D plan is quick to read. A 3D planner can help you picture height and flow. A hand sketch can still work for a simple layout.
The best method depends on the job. Use a digital plan when several people need updates. Use a tape measure or laser measure for critical dimensions. Recheck scan results against fixed points before sharing them.
| Method | Useful for | Main limitation |
| Hand-drawn plan | Quick room notes and simple layouts | Can miss scale and exact angles |
| 2D floorplan app | Room sizes and furniture footprints | Depends on accurate input data |
| 3D room planner | Visualising height, flow and furniture | May simplify real-world access |
| Phone room scan | Fast capture of room shape | Needs checks around reflective or irregular surfaces |
| Tape or laser measure | Critical clearances and openings | Requires careful manual recording |
Keep one master file with the date and revision number. Store photos beside the plan. Mark each measurement as checked or unconfirmed. A tidy file is easier to trust.
The Ultimate Immersive Test: 1:1 Scale Projections
A 1:1 scale projection lets you experience a floorplan at full size. It can reveal tight circulation and furniture clashes before moving day. This is an optional test, not a requirement for every household. Seeing is believing.
Lifesize Plans Sydney (Burwood Showroom)
The outline names Lifesize Plans Sydney in Burwood as a possible full-scale walkthrough option. Its online material has described projected floorplans at real size. Check current operating status, booking options and suitability before travelling. Do not treat an old listing as a confirmed appointment.
Ask whether you can bring your actual furniture dimensions. Check if moveable furniture props are available. Confirm the plan format they accept. This method is most useful when a new home is still being designed or fitted out.
Highwater Homes Walkthroughs
Highwater Homes describes full-size home walkthroughs as part of its custom-building process. The company is based in Smeaton Grange. Its walkthrough approach can help clients assess room flow and furniture space before construction.
This is a home-design service, not a removalist service. Ask whether the process suits your existing floorplan and moving needs. Check location, access and fees before making plans. A full-scale test is useful only when it answers your question.
Translate the Floorplan Mapping Into a Removalist Brief
Turn the mapped plans into a short removalist brief before requesting quotes. The brief should show what moves, where it goes and how the crew enters. Clear details help removalist companies understand the job. The devil is in the detail.
Prepare Annotated Plans for the Moving Crew
Send the old and new plans with clear room labels. Add arrows for the carry route. Mark the truck position, stairs, lift and loading area. Include a legend for every colour and code.
Keep the file easy to open on a phone. Use a PDF and name it with the move date. Add a contact person for questions. A simple plan beats a long email thread.
Flag Oversized and Difficult-to-Handle Items
List oversized furniture separately. Include dimensions, weight estimates and photos where known. Flag pianos, glass cabinets, large lounges and tall wardrobes. Say whether an item can be dismantled safely.
A furniture removalist service needs clear item details. House removalists and office removalists need them too. The same applies to interstate removalists, an interstate removalist or interstate furniture removalists. For international removalists or piano removalists, confirm the provider’s specialist scope before assuming the same process.
Searches may say removalists near me or removalist near me. People also compare removalist companies and cheap removalists. Some look for removalist truck hire. Whatever option you choose, give every provider the same floorplan and access information.
Searches include removalists Sydney, removalists Melbourne and removalists Brisbane. Match details to each route. The service scope may differ by city and distance. Include the removalist furniture list, not only the room plan.
Confirm Equipment and Crew Requirements
Ask the provider which equipment suits the route. This may include trolleys, lifting straps, floor protection and furniture blankets. Confirm whether disassembly is included. Ask how the team handles tight stairs or lifts.
Do not assume a standard crew or truck will suit every layout. Share the largest item dimensions and access notes. Ask the provider to confirm any special equipment before booking. Good planning avoids surprises.
Estimate Additional Handling Costs
Ask which details can change the quote. Long carries, stairs, lift delays and difficult parking may affect labour time. Oversized or fragile pieces may need extra handling. Each removalist sets its own pricing and terms.
Get any extra charges explained in writing. Ask whether the quote includes waiting time, travel, dismantling and reassembly. Compare what each provider includes, not only the headline price. A clear quote is easier to assess.
A floorplan can support a better-informed quote, but it cannot guarantee a fixed price alone. The inventory, access, timing and service scope also matter. Share the same details with each provider.
Six Brothers Removalists can review your plan and moving details before you request a quote. Visit Six Brothers Removalists or call 1300 764 372. You can also email info@sixbrothersremovalist.com.au. Ask for a free quote based on your actual inventory and access notes.
Moving Day Implementation
Use the final floorplan as the crew’s shared reference on moving day. Keep it visible and make the room codes easy to read. Update it if the plan changes. A good map keeps everyone on the same page.
Color-code your system
Give each destination zone one colour. Use the same colours on the plan, furniture tags and box labels. Keep the colour key on the first page. Avoid using similar shades for nearby rooms.
For example, use blue for living, green for bedrooms and orange for storage. Tell the crew what each colour means. A clear colour system saves repeated questions.
Label the boxes
Write the destination room and zone code on each box. Add a short contents note where helpful. Use labels on two sides so they remain visible when stacked. Keep fragile and priority items clearly marked.
Use the same codes as the furniture allocation matrix. This keeps boxes and large items aligned. The early bird catches the worm when labels are ready before packing day.
Post the master map
Place a printed master map near the entry, where the crew can see it safely. Keep a second copy with the move coordinator. Share a digital copy before arrival. Do not cover exits or building notices.
Walk through the new home before unloading begins. Check room names, access and any last-minute changes. Confirm where the large pieces should go. Then let the crew work from one agreed plan.
Before moving day, review the move-in walkthrough checklist and the Sydney moving house checklist. They can help you check room condition and wider move tasks. For more practical planning advice, browse removalist tips.
FAQs
What is pre-move floorplan mapping?
It compares both home layouts, room sizes, furniture footprints and access routes before moving day.
When should I map rooms before moving house?
Start when the new plan is available, then recheck after handover or settlement.
How do I check whether my furniture will fit in a new room?
Measure each item and usable room space, then test every doorway, turn and route.
Can a real estate agent provide a property floorplan in NSW?
Agents may hold marketing or dimensioned plans. Ask which version reflects the final property.
Does a floorplan help removalists quote accurately?
It shows rooms, items and access, but providers may still need an inventory and photos.
What information should I send removalists before booking?
Send both plans, an item list, dimensions, photos, stairs, lift and parking notes.
What to ask a removalist before hiring?
Confirm inclusions, access charges and specialist handling in writing before booking.
How to prepare for removalists?
Finish the room plan, label boxes, confirm access and keep the master map ready.
A little planning now can make the move easier to organise. Share your floorplans, inventory and access details with Six Brothers Removalists. Call 1300 764 372 or email info@sixbrothersremovalist.com.au. Request a free quote and compare the details before you book.