


Table of Contents
Photographing your belongings before an interstate move creates a clear condition record before packing starts. It also helps you build a useful moving inventory checklist for every room. Those photos can support quotes, packing decisions, unpacking, and any later damage discussion.
For a Sydney move, start before boxes take over your home. Photograph each important item from useful angles, then store the files in a simple system. The process takes time, but it can remove plenty of stress later.
Think of your photo record as a time-stamped map of what left your home. It shows what existed, how it looked, and where parts belonged. That clarity feels especially useful after a long interstate trip.
Use the same process beside your interstate relocation checklist. Your written list tracks tasks, while your photos track belongings. Together, they give your move a much stronger paper trail.

How to Set Up Your Camera and Space?
A simple phone camera is enough when the lens, lighting, and background are controlled. You do not need studio equipment or advanced camera settings. Start clean, and you will be good as gold.
Use your normal camera app and the highest practical image quality. Keep flash off unless the room is genuinely dark. Hold the phone steady and keep each item fully inside the frame.
Clean the lens
Clean the camera lens before you photograph the first room. Pocket dust and fingerprints can soften details without you noticing. A soft microfibre cloth works well and takes seconds.
Check one test image at full size before continuing. Look at labels, scratches, corners, and small marks. If those details look sharp, the rest of your record starts properly.
Turn on the lights
Turn on room lights and open curtains when daylight helps. Even lighting makes marks, colours, and surfaces easier to compare later. Avoid strong backlight from a bright window behind the item.
Move a lamp if one side looks too dark. Keep colours natural rather than using heavy filters. Your goal is evidence and clarity, not a social media photo.
Clear the background
Clear clutter behind the item before taking close condition photos. Extra boxes can hide edges and make later comparisons confusing. Give the item enough space to stand out clearly.
For small belongings, use a plain table or clean floor area. For larger furniture, move loose objects from nearby corners. A tidy frame helps the important details stay obvious.
Did you know?
Australian consumer guidance recommends photographing items and boxes before a removal. Clear photos work best when box numbers and fragile labels match your inventory.
When to Photograph Belongings Before Moving Day
Photograph belongings before wrapping, boxing, dismantling, or loading changes their visible condition. Aim to start several days before your removalists arrive. Get your ducks in a row before packing becomes flat out.
Start valuable, fragile, and complicated items first. These include televisions, artwork, antiques, appliances, designer furniture, computers, and musical instruments. Then move through each room using the same order.
Take final photos after packing where they add useful information. Show sealed boxes, labels, box numbers, and fragile markings. Do not replace pre-packing photos with box photos because both records serve different jobs.
If professional packers handle some rooms, photograph those belongings before their arrival. Tell the crew you are keeping a condition record. Good removalist companies should understand why an organised inventory matters.
A practical timeline is three to seven days before moving day. Finish the main record before the busiest final twenty-four hours. You can then add last-minute items without rushing the whole job.
Room-by-Room Photo Workflow for Sydney Interstate Moves
Work through one room at a time and finish it before starting another. This keeps filenames, box numbers, and inventory notes aligned. Room by room prevents the record becoming a dog’s breakfast.
Sydney homes can include apartments, terraces, townhouses, garages, balconies, and storage cages. Each space can hold items with different handling needs. Use one repeatable photo routine everywhere.
Kitchen Items
Photograph major appliances, valuable cookware, dinner sets, and fragile glassware before packing. Capture existing chips, dents, stains, and surface marks. Add model labels for ovens, microwaves, and portable appliances where useful.
Photograph grouped sets together before separating them into boxes. Examples include plate sets, wine glasses, and matching cookware. Then photograph the open box before protective material covers everything.
Bedroom Items
Record bed frames, bedside tables, mirrors, lamps, and valuable bedroom furniture. Photograph visible corners and surfaces before blankets or wrap hide them. Include mattress condition photos before adding any protective cover.
If a bed will be dismantled, photograph its assembled shape first. Add close photos around joins, slats, brackets, and existing damage. These images make later reassembly and condition checks much easier.
Laundry Items
Photograph washing machines, dryers, storage cabinets, and portable laundry appliances. Capture serial labels and connection points before hoses are removed. Show any existing dents around doors, lids, and side panels.
Keep a separate image of hoses and small fittings together. Never photograph private documents sitting on nearby shelves. Clear them away before taking wider room images.
Garage Items
Garages often contain tools, bikes, shelving, equipment, spare parts, and bulky boxes. Photograph higher-value tools separately and show complete sets together. Record scratches or wear on larger equipment before transport.
Do not pack hazardous goods just because they appear in your inventory. Ask your interstate removalist what cannot travel in the truck. Photograph excluded items only for your own home record.
Balcony Items
Photograph outdoor chairs, tables, planters, BBQ units, and decorative items before moving. Show weathering, rust, chips, and loose parts clearly. Outdoor wear can otherwise look like transport damage after arrival.
Take a wide balcony image before items move. This helps you remember grouped pieces and original placement. It can also reveal access details your removalist may need.
Storage Cage
Photograph the storage cage before you start removing anything. Then photograph larger items and numbered boxes as you work. Storage cages can be easy to overlook during a busy apartment move.
Create a separate folder named “Storage Cage” in your photo library. Match those files with your moving inventory checklist. This small step can prevent forgotten boxes at final pickup.

Photograph Furniture and Large Items Before Interstate Removal
Photograph large furniture before blankets, straps, or dismantling hide its original condition. Take one wide view, then add detail shots where needed. A clear record helps keep everything in good nick.
This matters for timber furniture, painted surfaces, glass panels, leather lounges, and polished finishes. The same method suits house removalists and furniture removalists. It also helps when several crews handle one interstate load.
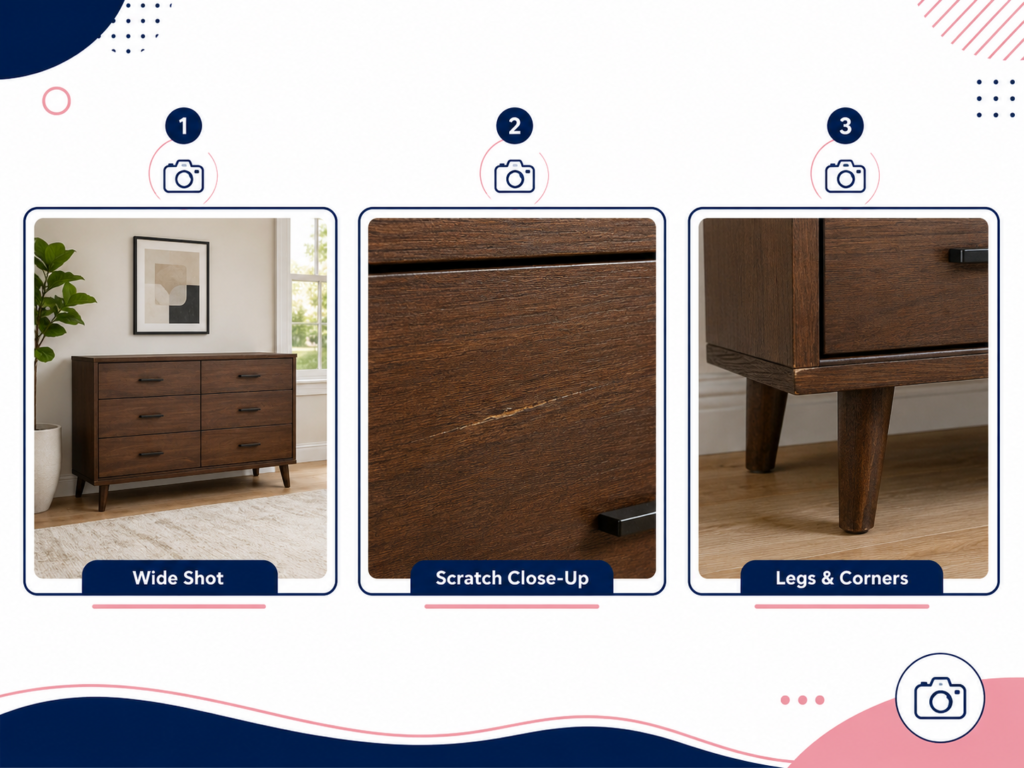
Take wide shots
Take one image showing the whole item from the front. Add another from the opposite side when practical. For tables and lounges, include a slight angle showing depth and shape.
Keep nearby clutter out of the frame where possible. Stand far enough back to avoid cutting off corners. A full-item photo gives context that close damage photos cannot provide.
Zoom in on damage
Photograph every existing scratch, chip, crack, stain, dent, or loose fitting. Use normal camera distance before relying on digital zoom. Digital zoom can reduce detail on many phones.
Place a ruler beside a mark when size matters. Keep one wider photo showing where the mark sits. Then take one closer image showing the mark itself.
Photograph the legs and corners
Furniture legs, corners, feet, handles, and edges take plenty of handling pressure. Photograph them before protective wrapping covers those areas. Pay extra attention to glass tables and polished timber pieces.
If you need more packing guidance, see how to protect furniture during an interstate move. Your photos and protective materials should work together. One records condition, while the other reduces avoidable damage.
Photograph Access-Sensitive Items for Interstate Removalists
Photograph items that may create access problems before the truck arrives. Include the item, nearby doorway, hallway, stairs, or lift where helpful. Share the useful images early, and moving day stays no dramas.
Access photos can help an interstate removalist plan crew size and handling equipment. They can also reveal whether furniture needs dismantling before exit. This is useful in Sydney apartments and narrow terrace homes.
Oversized Furniture
Photograph large lounges, wardrobes, dining tables, cabinets, and bedheads beside nearby access points. Show the item’s shape and the doorway together when possible. Record measurements separately inside your inventory notes.
Oversized items can look manageable until a tight turn appears. A photo gives the crew useful context before arrival. That helps furniture removalists plan instead of improvising at the door.
Heavy Appliances
Photograph fridges, washing machines, dryers, freezers, and other heavy appliances from several sides. Include floor clearances and nearby steps where access looks tight. Record visible damage before anything is moved.
Do not disconnect appliances only for the photograph. Follow manufacturer guidance and safe preparation steps instead. Ask your removalist about handling requirements before moving day.
Narrow Items
Tall mirrors, long shelves, bed rails, and narrow cabinets need clear length context. Photograph the complete item without cropping either end. Add a doorway image if the exit route looks close.
These items can be awkward despite their smaller volume. Their shape matters as much as their weight. Clear images help the crew decide how to angle them safely.
Awkward Shapes
Record L-shaped lounges, curved furniture, gym equipment, sculptures, and unusual décor from multiple angles. Show detachable sections before separating them. Photograph any fragile protrusions or uneven bases.
Awkward pieces often need special carrying positions. Their photos help the crew understand the job before loading. That can reduce surprises around stairs, corners, and loading ramps.
Specialty Handling
Pianos, antiques, artwork, safes, and delicate equipment deserve a more detailed record. Use wide photos, close condition photos, and identifying details. Keep values and purchase documents in a separate secure folder.
Someone comparing furniture removalists should explain specialty items before accepting a quote. The same applies to piano removalists and interstate furniture removalists. Detailed photos help describe the job without guesswork.
Document Disassembled Furniture and Loose Parts for Reassembly
Photograph furniture before, during, and after dismantling when parts must be reassembled later. Keep every fitting linked to one item and one room. Label well, and the rebuild becomes a piece of cake.
Your photos should show where parts came from before removal. They should also show how brackets, rails, and hardware connect. Think of the parts record as a breadcrumb trail back to the finished item.
Screws and Bolts
Photograph screws and bolts beside the furniture before placing them in a bag. Group each item’s hardware separately. Never mix several furniture sets inside one unlabelled container.
Write the room and item name on each parts bag. Add the matching box number if the bag travels inside a carton. Photograph the labelled bag before packing it away.
Brackets
Photograph brackets while they are still attached when practical. This captures orientation and screw position. Then photograph each bracket set after removal.
Some brackets look almost identical when loose. A clear image can save time during reassembly. It also reduces the chance of forcing the wrong fitting.
Table Legs
Take a full table photo before removing any legs. Then photograph the underside and each connection point. Keep bolts, washers, and plates together inside one labelled bag.
If the legs differ, label their positions before removal. Simple marks like front-left can help later. Photograph those labels so the system survives the journey.
Bed Frames
Photograph the assembled bed frame from above and one side. Add close images of slat positions, centre supports, and corner joins. This is useful for frames with several similar rails.
Keep bed hardware separate from bedside table hardware. Label every bag with the bedroom name. Larger homes should also use bedroom numbers for easier matching.
Parts Bags
Use sturdy clear bags for small hardware when suitable. Add one label outside and another paper label inside. Photograph each completed bag before placing it into a priority box.
Do not tape loose screws directly onto polished furniture. Tape can damage finishes or leave residue. A labelled parts bag gives you a cleaner system.
Reassembly Notes
Add short notes beside complicated pieces inside your inventory file. Record which side faces forward and which part attaches first. Pair the notes with matching photo filenames.
For complex furniture, a thirty-second video may help more than ten photos. Keep narration simple and factual. State the item, room, and key connection points.
Photograph Electronics and Appliances Before an Interstate Move
Photograph electronics and appliances before cables, stands, remotes, and fittings are separated. Record identification details and visible condition while everything still works. Do the checks now, and she will be right later.
The goal is not proving every possible technical fault. It is creating a simple record of identity, condition, setup, and function. That record can help during unpacking and troubleshooting.
Snap the serial number
Photograph model and serial labels on televisions, computers, monitors, speakers, and major appliances. Make sure the text is sharp enough to read. Keep these images with the item’s main condition photos.
Serial details help identify similar products in one household. They also support warranty records and inventory accuracy. Avoid sharing these images publicly because identifying details may be visible.
Show that it works
Photograph the device switched on when safe and practical. Show a television display, computer start screen, or appliance control panel. Keep the image simple and avoid displaying private account information.
A still photo cannot prove every function. However, it creates useful context before transport. Add a short video when operation matters more than appearance.
Label the cords
Photograph cable connections before unplugging complicated systems. Use small labels on cords and ports where needed. Then photograph the labelled cables together before packing.
This helps televisions, desktop computers, speakers, and entertainment systems. It can also reduce setup mistakes after arrival. Keep remotes and power supplies grouped with their matching device.
Take Videos of Functional Electronics and Equipment Before Transport
Short videos can show movement, sound, displays, and working functions that still photos cannot capture. Record only important equipment and keep each clip brief. A useful ten-second clip can be worth its weight in gold.
Start by stating the item name and room. Then show the device powered on and working normally. Finish with one clear view of the item’s outside condition.
Use video for televisions, computers, powered recliners, treadmills, speakers, and similar equipment. Avoid filming passwords, private messages, account names, or family documents. Pause and clear sensitive screens before recording.
Store videos beside the matching item photos. Rename them using the same item number. That makes each record easy to locate after your interstate move.
Could a thirty-second video save an hour of arguing later? Sometimes it can provide valuable context. Keep expectations sensible because policies and claims still depend on their own terms.
Capture Mattresses, Rugs, and Soft Furnishings Before Packing
Photograph soft furnishings before covers hide stains, tears, fading, or worn edges. Use bright, even light because fabric marks can disappear in shadows. Keep the soft stuff in good nick from record to arrival.
Fabric items change shape when folded, rolled, or wrapped. A pre-packing image shows their original appearance. Add close photos only where marks or damage already exist.
Mattress Sides
Photograph both mattress faces and all four sides before wrapping. Capture seams, handles, stains, tears, and compressed corners. Include the brand label when it helps identify the mattress.
Use a clean, bright room for these images. Avoid placing personal bedding or documents in the frame. Fit the protective cover only after finishing the condition record.
Lounge Fabric
Photograph fabric lounges from the front, back, and sides. Add close images of stains, pulls, worn seams, or faded areas. Keep cushions in place for one complete reference photo.
Then remove cushions and photograph the base beneath them. This helps record hidden marks and loose fittings. Reassemble the lounge before final protective wrapping.
Rug Edges
Lay rugs flat when possible and photograph the full pattern. Add closer images of corners, fringe, binding, and existing stains. Photograph the rug before rolling or folding it.
If a rug has a label, record that too. Keep expensive rug documentation in your secure records. Do not tape labels directly onto delicate fibres.
Cushion Sets
Photograph matching cushions together before separating them. Record tears, missing buttons, damaged zips, and fabric marks. Use one group photo and detailed images where needed.
Match cushion sets to their lounge or outdoor furniture entry. This avoids mystery cushions during unpacking. It also helps your box inventory stay accurate.
Curtain Panels
Photograph curtain panels while hanging before removal. This shows length, colour, pattern, and matching sets. Add close images of stains or damaged hems.
Bundle hardware separately and label the room. Photograph hooks, rods, and brackets before packing. Do not mix several rooms’ curtain fittings inside one bag.
Photograph Outdoor, Garage, and Balcony Items Before Moving
Outdoor and garage belongings need the same condition record as indoor furniture. Dirt, weathering, rust, and old scratches should appear clearly. Give every outdoor item a fair go in the record.
Clean only enough to reveal the real condition. Do not hide existing damage with temporary cosmetic fixes. Photograph special handling points before items enter the truck.
BBQ Units
Photograph the BBQ body, lid, shelves, wheels, and existing rust. Record removable plates and accessories separately. Follow removalist rules for gas bottles and fuel-related items.
Never assume a gas cylinder can travel as packed household goods. Ask your mover about current requirements. Keep any excluded cylinder out of the loading area.
Bikes
Photograph each bike from both sides. Add close images of frames, wheels, gears, brakes, and valuable accessories. Record the serial number where it is easy to find.
Remove loose accessories only when needed. Put small parts into labelled bags. Photograph the final packed or protected bike before loading.
Garden Tools
Photograph grouped garden tools, power tools, and higher-value equipment before packing. Show existing wear on handles and powered equipment. Clean soil from interstate garden items when required.
Keep sharp tools protected and clearly labelled. Separate fuels, chemicals, and restricted goods. Ask the removalist before packing anything uncertain.
Outdoor Furniture
Photograph tables, chairs, benches, umbrellas, and modular outdoor sets. Show weathering and existing surface marks. Record detachable pieces before separating them.
Label matching parts by set. Keep screws, clips, and connectors together. Photograph the parts bag before packing it with the correct furniture.
Sports Gear
Photograph bicycles, golf clubs, gym equipment, surf gear, and other valuable sporting items. Group accessories with the main equipment where possible. Record wear before protective covers are added.
Heavy gym machines may need dismantling. Photograph cable routes and adjustment points first. Add a brief video if moving parts need a clearer record.
Plant Pots
Photograph valuable or fragile plant pots before moving. Show chips, cracks, drainage trays, and decorative finishes. Check interstate biosecurity rules before planning plant transport.
Some plants or soil may face restrictions between states. Confirm the rules for your destination. Do not assume your removalist can carry every plant.
Record Fragile, High-Value, and Packed Items
Fragile and high-value belongings deserve more detailed photos before the box closes. Record identity, condition, packing layers, and final labels where useful. Better safe than sorry is fair dinkum common sense.
Examples include artwork, antiques, glassware, jewellery boxes, collectibles, designer items, and musical instruments. Keep very sensitive valuables with you when appropriate. Ask your mover about exclusions and insurance conditions.
Photograph open boxes
Photograph an open box before the final cushioning layer covers its contents. Show item arrangement without removing safe packing. Do this mainly for fragile or higher-value cartons.
Do not photograph every ordinary box unless the record stays useful. Focus on boxes where contents or packing quality matter. Then photograph the sealed box number.
Document the labels
Photograph the final box label after sealing. Show the room, box number, and fragile marking. Match that number inside your moving inventory checklist.
Clear box numbering helps at delivery. A quick count can reveal a missing carton quickly. Queensland Government removalist guidance also recommends photos and carton numbering.
Art and Antiques
Photograph artwork and antiques straight-on, then from relevant side angles. Add close images of frames, signatures, labels, chips, cracks, or worn surfaces. Keep purchase records separately when available.
For high-value pieces, ask about specialty packing before moving day. Make sure the quoted service matches the item’s needs. If you later face items damaged during an interstate move, detailed records can support the discussion.
Use Photos to Support Your Interstate Moving Inventory
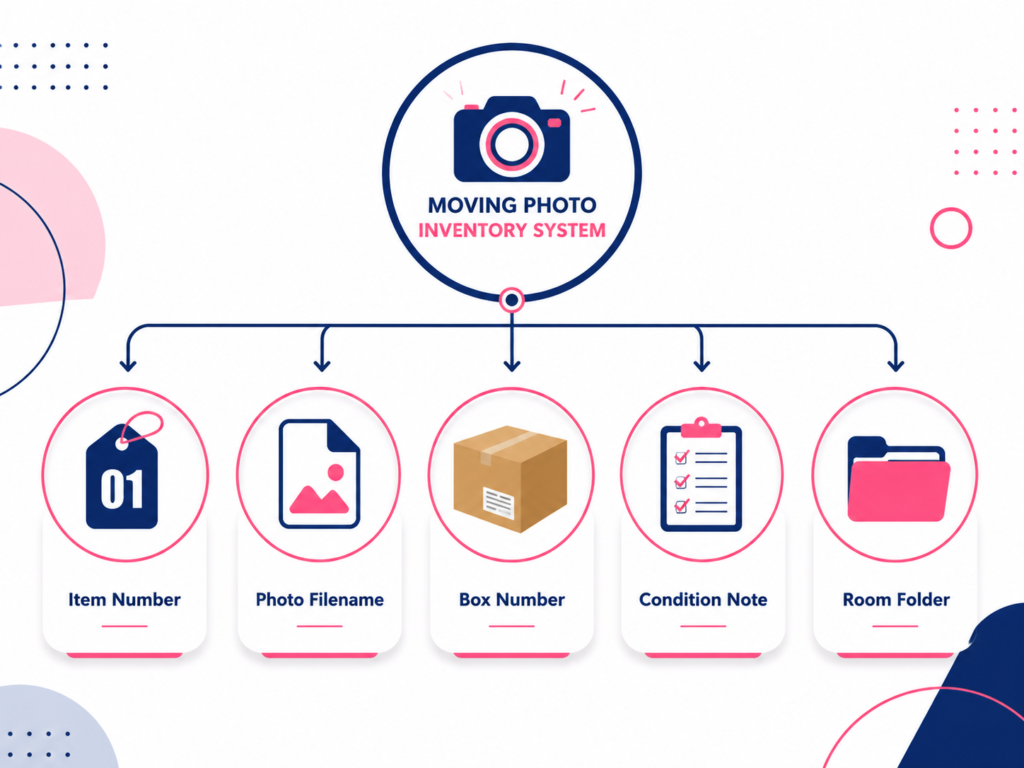
What good is a photo if you cannot match it to the right item later?
Photos work best when every important image connects to a written inventory entry. Use one item number across photos, videos, parts bags, and boxes. Keep everyone on the same page, and the move stays no dramas.
A moving inventory checklist should record the room, item name, box number, and condition. Add notes for values, serial numbers, dismantled parts, or special handling. Your photos then show the visual details behind those notes.
Treat the inventory like a receipt for your whole home. A written line says what moved, while the image shows its condition. This combination is more useful than hundreds of unlabelled photos.
The same system helps when requesting interstate quotes. Accurate furniture counts, box totals, and large-item photos improve the information given to movers. It can also highlight access-sensitive or specialty items before booking.
This matters across common Sydney routes. You might compare removalists Sydney to Melbourne or removalists Sydney to Brisbane. Others compare removalists Sydney to Adelaide or removalists Sydney to Canberra.
Some households need removalists Sydney to Wollongong or removalists Sydney to Gold Coast. Longer moves may involve sydney to melbourne removalists or sydney to brisbane removalists. A clear inventory helps every route start with better information.
Search terms may differ, but the preparation stays similar. People compare removalist sydney to melbourne and removalist sydney to brisbane services. Others look for removalist sydney to gold coast options before choosing dates.
Sydney families may compare interstate removalists sydney or sydney interstate removalists. Some use interstate removalist sydney when requesting quotes. Clear photos make those quote discussions more specific and useful.
Organise Your Moving Photos for Inventory and Claim Support
Organise photos while taking them, not after hundreds of files pile up. Use folders, useful filenames, backups, and simple condition notes. A tidy folder saves hard yakka after delivery.
Keep the system simple enough to maintain. Complicated apps can become another unfinished moving task. Your phone folders and a spreadsheet are enough for many households.
Create Folders
Create one main folder for the interstate move. Inside it, create room folders for kitchen, bedrooms, laundry, garage, balcony, and storage. Add a separate folder for videos and important documents.
Use the same room names inside your inventory list. Consistent naming reduces confusion. It also makes searching faster after delivery.
Rename Files
Rename important images with item number, item name, and view. Examples include “K12-fridge-front” or “B04-bedframe-corner-damage.” Keep names short and consistent.
You do not need to rename every ordinary image. Prioritise valuable, damaged, dismantled, or complicated items. Leave simpler room overview photos in their original sequence.
Back Up Online
Back up the main photo folder before moving day. Use a trusted cloud service or another secure location. Keep one copy separate from the phone travelling with you.
A phone can break, disappear, or run out of storage. One backup removes that single point of failure. Check that the files actually finished uploading.
Log Condition
Add short condition notes beside important inventory entries. Use plain descriptions such as “small chip on rear-left corner.” Avoid vague notes like “old” or “used.”
Match each note to a photo number when practical. This helps you find supporting images quickly. Keep the wording factual and calm.
Protect Privacy When Storing Moving Photos
Moving photos can accidentally capture addresses, documents, account screens, children, keys, and serial numbers. Review sensitive images before sharing them with anyone. Keep your personal details under your hat.
Store the full record privately. Share only the images a removalist, insurer, or service provider genuinely needs. Do not send your whole photo library by default.
Hide Documents
Remove passports, bank letters, contracts, bills, and medical papers before taking room photos. Check desks, kitchen benches, bedside tables, and noticeboards. Small background details can still be readable.
Keep identity documents in a separate secure folder. Do not include them inside general moving photo albums. Carry essential originals with you where appropriate.
Blur Personal Details
Blur addresses, account numbers, faces, or private screens before sharing a copy. Keep the unedited original in your private archive. Do not overwrite the only original image.
Use built-in phone editing tools for simple redaction. Check the saved copy at full size. Make sure hidden text cannot still be read.
Secure Cloud Access
Protect the cloud account holding your moving photos with a strong unique password. Turn on multi-factor authentication where available. Cyber.gov.au recommends MFA as an extra security layer.
Review which devices remain signed into the account. Remove old phones or computers you no longer use. Keep recovery details current before moving day.
Avoid Public Links
Do not upload your moving inventory to public social folders. Avoid open links that anyone can forward. Use restricted sharing when a third party needs specific images.
Set an expiry date if your cloud service supports one. Remove access after the issue is resolved. Keep your main archive private.
Keep Originals
Keep original photos even after creating cropped or blurred copies. Originals preserve the strongest record of what the camera captured. Store them in the private backup folder.
Do not delete original timestamps or filenames without a reason. You can create organised copies while keeping originals untouched. That gives you both convenience and a clean source record.
Common Photo Mistakes Before an Interstate Move
Most photo mistakes come from rushing, poor organisation, or deleting useful originals too early. Fix the process before the final packing rush. Do not let the record become a dog’s breakfast.
You do not need perfect photography. You need clear, consistent, findable images that show identity and condition. Review each room before calling it finished.
Blurry Images
Blurry photos hide scratches, labels, serial numbers, and fine damage. Hold the phone steady and tap the item before taking the shot. Check critical images at full size.
Retake any image that looks soft. One sharp image beats several unusable ones. Clean the lens again when images suddenly lose clarity.
Missing Angles
One front photo may miss damage on sides, backs, corners, or legs. Add angles based on each item’s shape and risk. Do not take identical images from nearly the same position.
For large items, use one wide view and targeted detail images. For artwork, include frame corners and surfaces. For appliances, include sides and labels.
Poor Lighting
Dark images can hide marks and colour differences. Turn on lights and use daylight when helpful. Avoid harsh shadows across the area you need to record.
Do not rely on heavy editing later. Brightness changes can alter how marks appear. Capture a clear, natural image from the start.
No Item Order
Random photos become difficult to match after packing. Work room by room and keep important files linked to inventory entries. Use box numbers and item numbers consistently.
This matters more during large house moves. It also matters for office removalists handling many similar desks or devices. Order saves time at both ends.
Deleted Originals
Do not delete originals immediately after making edited copies. Keep them until the move, unpacking, and any claim period have finished. Check your relevant policy and contract for record needs.
Storage is cheap compared with replacing missing evidence. Back up originals before clearing phone space. Delete later when you are confident they are no longer needed.
Choosing a Removalist With a Clear Photo Inventory
A clear inventory can make quote discussions more accurate and less stressful. Share relevant item and access photos, not your whole private archive. Keep it on the money by giving movers useful facts.
Sydney buyers use many search phrases while comparing options. They may look for removalists, a removalist, or interstate removalists. Others compare house removalists, office removalists, and furniture removalists.
Some searches focus on location. People compare removalists sydney, removalist sydney, or removalist from sydney. Parramatta residents may compare removalists parramatta, removalist parramatta, or movers parramatta.
Others use broad local searches like removalists near me or removalist near me. Price-focused users may search cheap removalists or affordable removalists sydney. Cheap interstate removalists sydney can also attract budget-focused comparisons.
A low headline price should not replace clear scope. Ask what the quote includes, how access changes pricing, and what cover applies. Your photo inventory helps describe the job before anyone arrives.
Route searches can get very specific. Examples include interstate removalists sydney to melbourne and interstate removalists sydney to brisbane. Some people compare interstate removalists sydney to gold coast as well.
The same applies to local service types. Sydney removalists may handle homes, offices, and specialist furniture. People also compare furniture removalists sydney or house removalists sydney for specific jobs.
Searchers may compare full service removalists sydney or furniture removalist sydney. Some want a removalist in sydney for one clear job. Others compare removalists in sydney before choosing a crew.
Businesses may need office removalist sydney or office removalists sydney. Families heading south may compare sydney to canberra removalists. Clear photos help every provider understand the same scope.
Specialty moves create different needs. Piano removalist sydney and piano removalists sydney may require extra handling details. Photograph the piano, access path, steps, and tight corners before quoting.
Other Australian moves start outside Sydney. People may compare removalists melbourne, removalists brisbane, or international removalists. The same photo system still supports a cleaner inventory and clearer scope.
Some movers choose removalist truck hire and handle loading themselves. Others want removalist furniture handling from a professional crew. Either approach benefits from a clear pre-move condition record.
If you compare removalist companies, judge more than price. Check written scope, access details, insurance information, timing, and communication. A useful photo inventory makes those conversations much easier.
Photograph First, Move With Confidence
A strong moving photo record is simple, organised, and finished before packing gets hectic. It records condition, identity, parts, boxes, and access details. Get that sorted, and you can move with no worries.
Start room by room, then connect important photos to your moving inventory checklist. Keep originals secure and back them up. Share only the images your removalist genuinely needs.
Your record should support the move, not become another stressful project. Focus on valuable, fragile, complicated, and access-sensitive items first. Then add enough general photos to keep the inventory clear.
When you are ready to compare quotes, Six Brothers Removalists can review your move details. Call 1300 764 372 or email info@sixbrothersremovalist.com.au. Ask for a free quote with your inventory ready.
A clear record gives you confidence before the truck leaves Sydney. It also gives the crew better information before moving day. That is a small job now for much more relief later.
Frequently Asked Questions
Do Removalists Have Insurance?
Insurance arrangements vary between companies and services. Ask what cover applies before booking and read the relevant terms. Do not assume every type of damage is automatically covered.
NSW consumer guidance recommends checking insurance arrangements before hiring a removalist. Keep your own contents insurer informed where needed. Store quotes, contracts, inventories, and condition photos together.
How to Prepare for Removalists?
Prepare by finishing packing, labelling boxes, clearing access, and documenting important belongings. Share access details and specialty items before moving day. Keep valuables and essential documents separate where appropriate.
Your photos should already be organised before the crew arrives. Keep your inventory accessible on your phone and offline. That prevents frantic searching during loading.
What photos should I take before an interstate move?
Take full-item photos and close images of existing damage. Record serial numbers, labels, corners, legs, and fragile areas. Add access photos when furniture may be difficult to remove.
For packed valuables, photograph the open box and final label. Keep ordinary box photography selective. Focus effort where the record adds real value.
Should I photograph every box before moving?
You usually do not need detailed photos of every ordinary carton. Number every box and photograph valuable or fragile boxes more carefully. Keep the system useful instead of creating thousands of random images.
Take a final photo showing each sealed box label. This can help with box counts after delivery. Match the number to your inventory list.
How should I photograph existing scratches on furniture?
Take one wider image showing where the scratch sits. Then take a closer image showing its shape and size. Use good lighting and avoid reflections across glossy surfaces.
Add a short condition note inside your inventory. For example, write “surface scratch on right-front corner.” Keep language factual and specific.
Are videos useful for electronics before moving?
Yes, short videos can record normal operation before transport. Show the item switching on and performing one key function. Avoid filming passwords, messages, or private account details.
Keep each video brief and rename it clearly. Store it beside the matching photos. Back everything up before moving day.
How long should I keep moving photos after the move?
Keep them through delivery, unpacking, and any relevant claim or dispute period. Check your contract and insurance policy for specific deadlines. Do not delete evidence while an issue remains unresolved.
Once everything is settled, decide what still deserves long-term storage. Serial numbers and valuable-item photos may remain useful. Remove unnecessary shared links before archiving the folder.